MOD ORGANIZER 2
Mod Organizer 2, aka MO2, is a powerful and versatile mod manager, primarily used for Bethesda games. Its standout feature is the virtual file system (USVFS), which keeps mods separate from the actual game folder. This means you can install or remove mods safely, reorder them at any time via drag-and-drop, maintain multiple profiles, and keep your original game files untouched.
MO2’s interface is split into two panes (one for mods, one for plugins) making it easy to spot conflicts and manage load order. Unlike Vortex, which relies on a convoluted group/rules system, MO2 gives you complete control over how mods interact. Additional perks include a fully portable setup, integrated Nexus Mods support for direct downloads, and a plugin system that allows advanced users to extend functionality. While MO2 is generally the superior choice, this doesn’t mean Vortex is a bad mod manager: use whichever tool best fits YOUR needs and comfort level. That said, it is strongly advised to avoid older or unsupported mod managers such as FOMM, NMM (even the Community Edition), Kortex, or Wrye Bash. This also includes MO1.
Installing Mod Organizer 2
- Download the main file (manual download)
- Run the installer
Mod Organizer 2.exe - When choosing a destination location, pick a location that is not a default Windows directory, not the game folder, not a folder managed by OneDrive, and not inside another portable MO2 installation
- When prompted to
Select Components, just clickNext - You can choose a
Start Menufolder and desktop shortcut, or not - Click
Installand wait for it to complete - Launch MO2
Configuring Mod Organizer 2
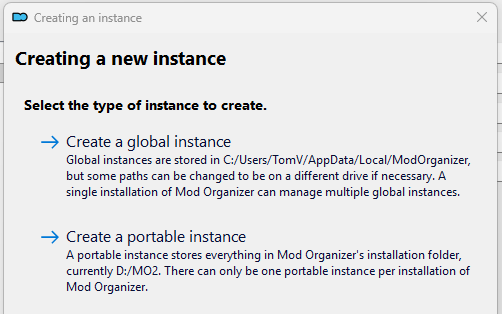
Create an Instance
You will have the option to create either a global instance, or a portable instance. A global instance of MO2 shares settings, profiles, and mods, while a portable instance keeps everything self-contained in a single folder that can be moved or backed up independently. I recommend using a portable instance.
- From the game list, select New Vegas
- Select the applicable game edition
- Choose a name for the instance, e.g. DUSTy Roads
- When asked to configure the profile settings, check all boxes
- Default location to store data will be under
AppData. You can keep this file path, or choose another, but preferably on the same drive as FNV and MO2 - Finish and launch the new instance
- A pop-up might appear:
- Show tutorial? Select
No - Register? Select
Yes - INI file is read-only? Select
Remember my choicein the drop-down and opt forClear the read-only flag - Category setup? Select the option you prefer (I personally don't use the Nexus categories)
- Show tutorial? Select
Game Settings
New Vegas is automatically selected to run (in the top-right corner). But to set a few game settings, change this to Fallout Launcher.
- Run the game with Fallout Launcher
- Click
Options - Select the Ultra preset (or another preset accordingly to your system specifications)
- Set the resolution to your monitor's native resolution
- Exit the launcher, and change the program back to New Vegas
FalloutPrefs.ini. Click the
 Tools button in the toolbar.- Select
INI Editor - Go to the FalloutPrefs.ini tab
- Go to the
Displaysection, and set the following values:
iSize W= screen width (e.g., 2560)
iSize H= screen height (e.g., 1440) - Click the
Savebutton
Thanks to JIP LN NVSE, you can use a custom INI to add various settings without touching the main INIs. FalloutCustom.ini takes precedence over the other INI files and cannot be modified by the game.
Click the Tools button in the toolbar and paste these settings in the FalloutCustom.ini tab:
Overwrite Folder
At the bottom of the left pane, you’ll find the Overwrite folder. This folder contains all files generated during gameplay (such as configuration files) or created by modding tools. You can leave these files there, or keep your setup organized by creating a new mod from the Overwrite contents. Keep in mind that files in Overwrite will take priority over other mods, so make sure you know what’s in there and avoid unintentional conflicts. Leaving files unmanaged in Overwrite is one of the most common sources of hidden issues!
Settings and Workarounds
 Click the
 Settings button in the toolbar to access MO2's settings.
There are various settings that let you customize how you interact with MO2, as well as how it looks and feels (Theme tab for example). To keep this guide concise, these options will not be covered, so feel free to explore them yourself. That said, do check these out:
- Nexus tab: here you can connect/disconnect to Nexus Mods, and associate MO2 with
Download with managerlinks. Here, you can also configure your preferred download server. - Workarounds tab: check the option
Enable archives parsing (experimental). This will allow MO2 to report conflicts in mod's bsa archives. Useful for troubleshooting!
Adding Executables
There are several tools used for modding (such as xEdit and the GECK) or generate LOD (xLODGen). These tools need to be added to MO2 so they can detect and work with your installed mods.
 Click the
 Configuring executables button in the toolbar.
- Add an executable by clicking the
+button and selectAdd from file... - Navigate to the location where the tool is installed, and select the executable (
.exeor.bat) - You can now give it a name (Title) or add arguments (for instance,
-fnvfor xEdit) - You can enable additional options based on preference, such as Create files in mod instead of overwrite: here you can specify an output mod for new or modified files
Conflict Resolution
Just like plugin load order, the mod load order (MO2’s left pane) is equally important. Assets such as textures and meshes are overridden by mods loaded below them (i.e. higher priority). MO2’s Flags column provides visual indicators of file conflicts. Reordering mods (via simple drag and drop) may be necessary to resolve them:
 means the mod has asset(s) overriding others (conflict winner)
 means the mod has asset(s) being overridden by others (conflict loser)
 means the mod has asset(s) both conflict winners as conflict losers
 When a file in a
 bsaarchive is conflicting, the lightning icon will be blue
To find out what file is conflicting, double-click the mod, and go to the Conflicts tab:
- Top pane shows the winning file conflicts
- Middle pane shows the losing file conflicts
- Bottom pane shows the non-conflicting files
In case of textures (.dds files), MO2 allows you to directly compare the conflicting textures. Double-click the texture to open it in a new window and use the arrow buttons in the top-right corner to cycle through the different versions and decide which one should win the conflict.