LOD GENERATION
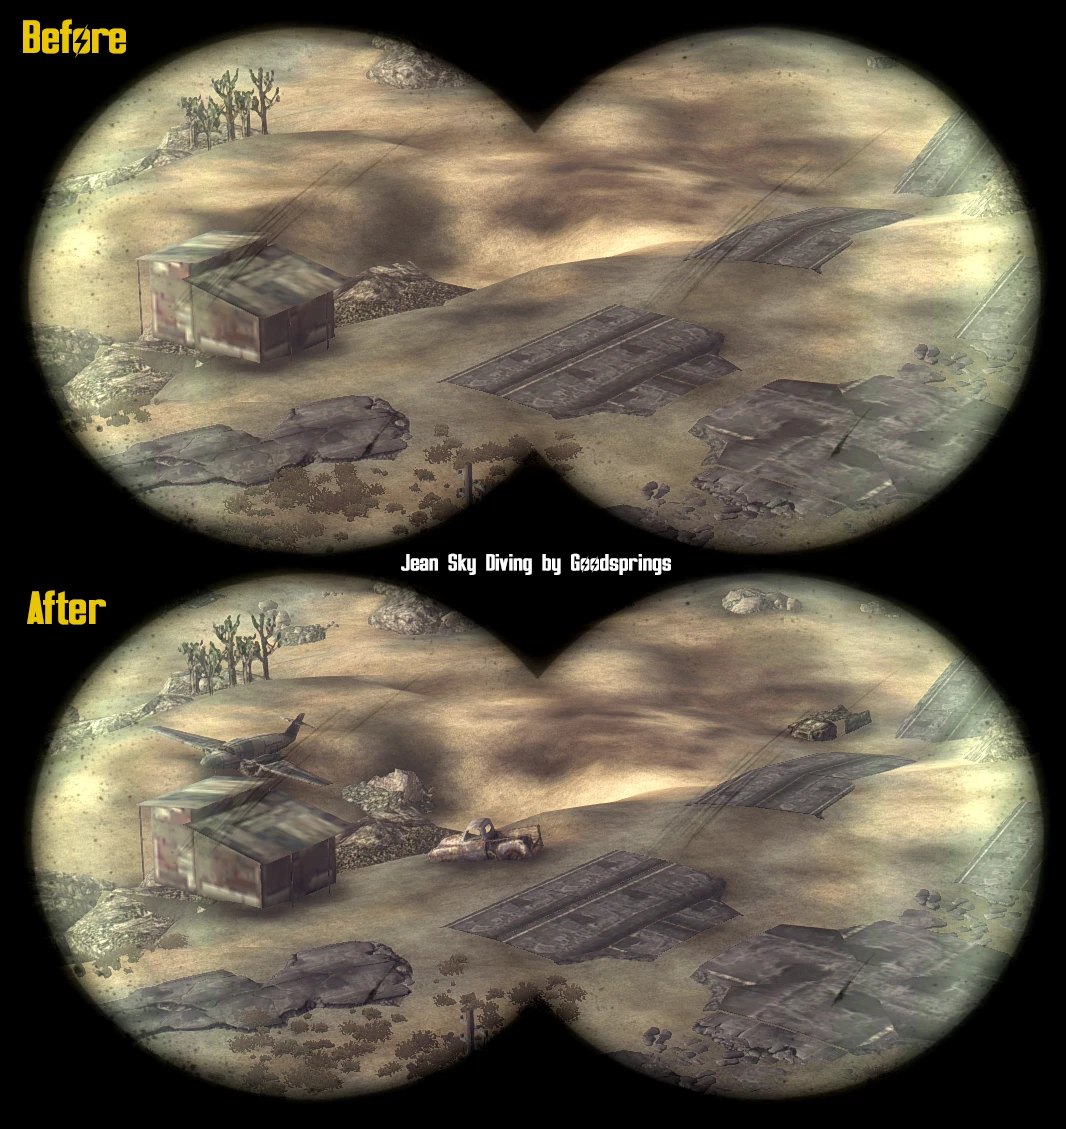
LOD (Level of Detail) refers to simplified versions of distant objects in the game world, such as terrain, buildings, and trees. Instead of rendering full-detail models far away, the game uses lower-detail versions to improve performance. As you move closer, these objects gradually switch to their full-detail versions. Proper LOD ensures distant landscapes look consistent and reduces visual pop-in while keeping the game running smoothly.
- Objects LOD: Displays simplified versions of distant structures and objects (like buildings and ruins).
- Terrain LOD: Renders the distant landscape (hills, ground, roads) as a lower-detail mesh to create a seamless horizon.
- Tree LOD: Primarily used for small flora (bushes, shrubs), while larger trees are often handled by objects LOD.
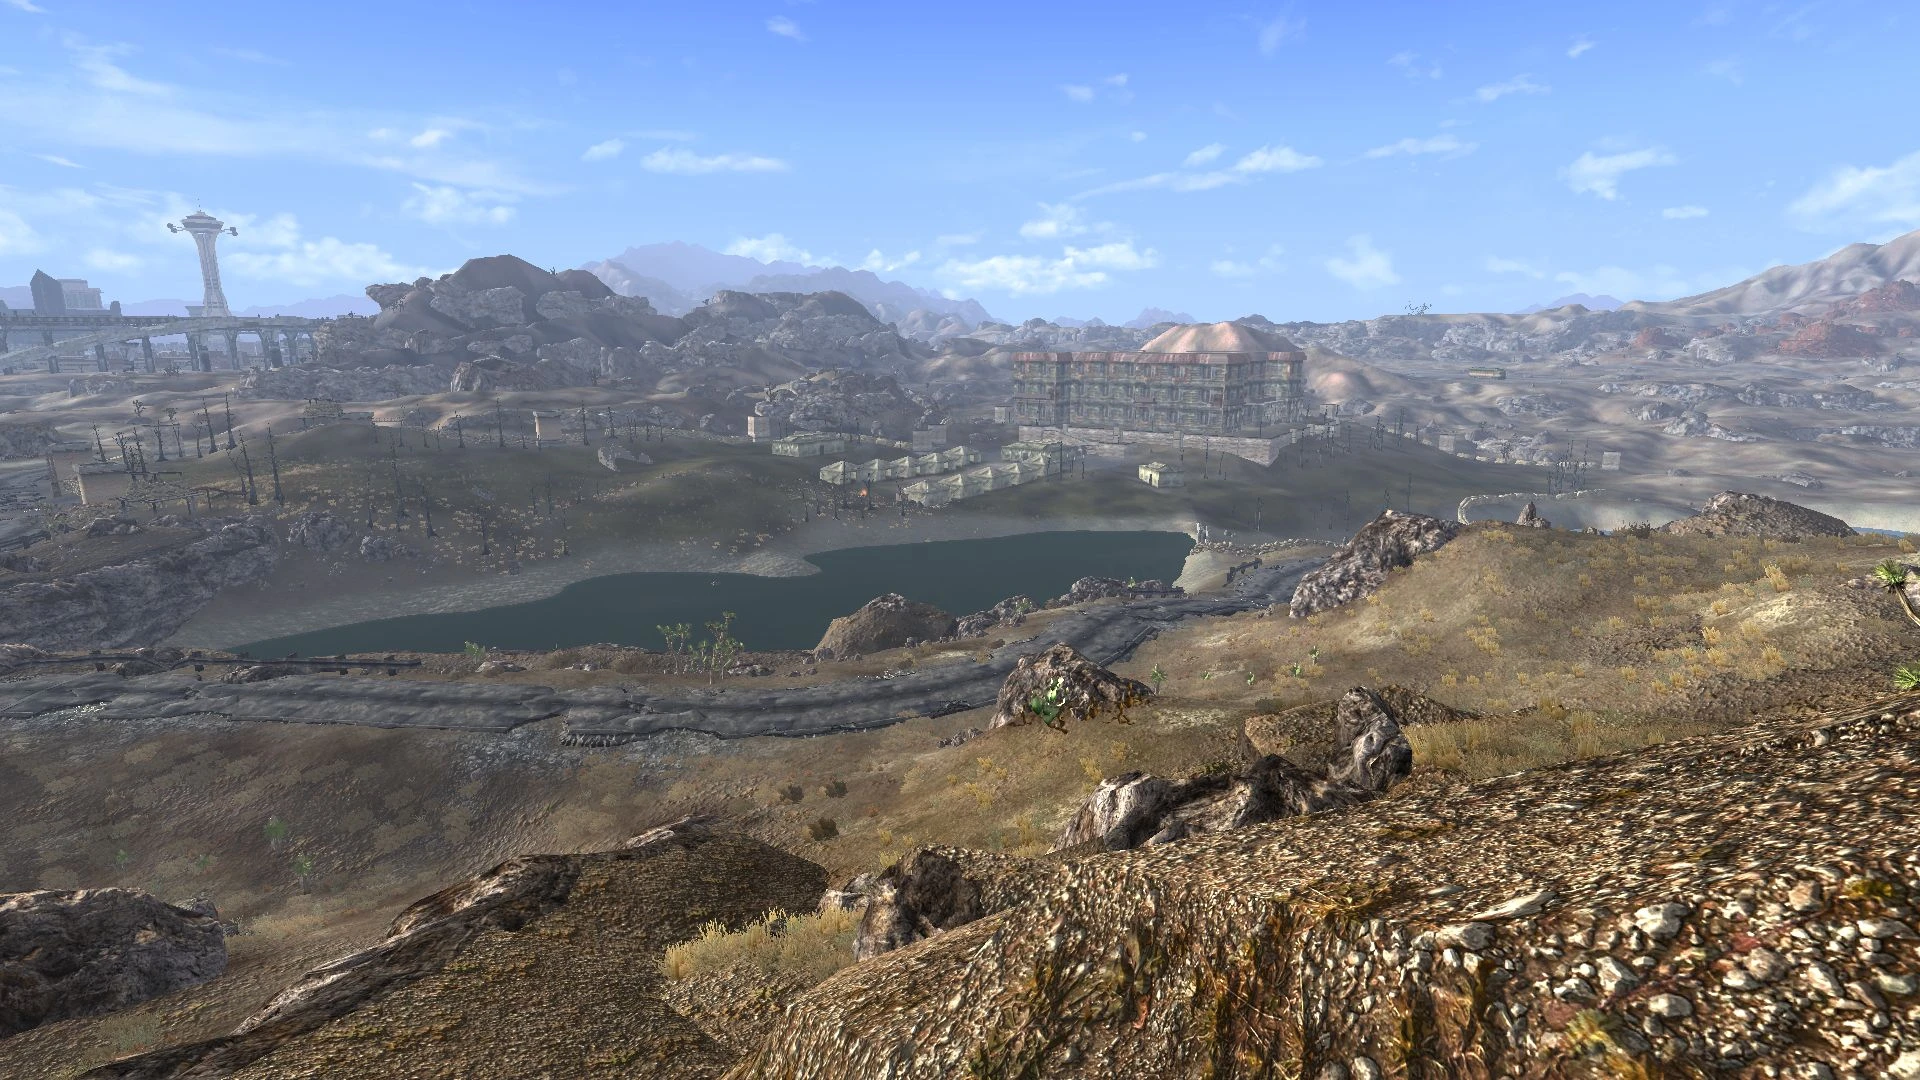
Why generate LOD if it’s already included in a mod or in this guide? Because LOD is static and does not account for changes made by other mods. By generating LOD yourself, you ensure the visuals accurately reflect your specific mod setup. Dust Community Fixes and Tweaks only includes terrain LOD for the Wasteland, primarily to address water LOD in the drained Colorado River and Lake Mead, but it does not provide object or tree LOD. For that reason, generating LOD yourself is always recommended.
Create a separator
Right-click in the left pane of MO2 and select Create separator. Name it LOD.
Required Resources
FNVLODGen

- Download the main file FNVLODGen Resources
- Hide the
FNVLODGen.espplugin
- Double click the mod in the left pane
- Go to the Optional Plugins tab
- Select the plugin in the right table (Available Plugins) and click on the green arrow pointing left
- The plugin is now moved to Optional Plugins
Much Needed LOD
- Download the main file Much Needed LOD
- Hide the
MuchNeededLOD.espplugin
Much Needed LOD fixed rocks color

- Download the main file Much Needed LOD fixed rocks color
LOD additions and improvements
- Download the main file LODadditions
- Hide the
tmzLODadditions.espplugin
FNV LOD Supplementation

- Download the main file FNV LOD Supplementation
- Download the optional file Optional Overpasses
TCM's LOD Overhaul

- Download the main file TCM's LOD Overhaul
More LODs Additions and fixes
- Download the main file More LODs Additions and fixes
Wasted LOD - Cliffs of Mojave
- Download the main file Version 1.0
- Hide the
Wasted Mojave Rock LOD.espplugin
Different LOD mods little tweaks and additions
- Download the main file Different LOD mods little tweaks and additions
LODIFY - Level of detail improvement for your Fallout (TTW And NV Lods)
- Download the main file LODIFY
- Download the optional file LODIFY FNV Wall_SoGB Editon
- Hide the
TTWLods.espandLODIFY_FNV.espplugins
Decent LOD Kit

- Download the main file Decent LOD Kit
- Hide the
Decent LOD Kit.espplugin
TTW Fallout 3 LOD

- Download the main file TTW Fallout 3 LOD. Yes, it says TTW, and yes you need it.
- Hide the
TTW Fallout 3 LOD.espplugin
Physically Based LOD

- Download the main file Physically Based LOD
Nuclear LOD

- Download the main file Nuclear Core
- Download the main file Nuclear Trees - Vanilla
- Hide the
Nuclear_LOD.espandTreeLOD_Vanilla.espplugins
High Priority LOD
- Download the main file High Priority Core - with NVMIM
- Download the main file High Priority Trees - Vanilla
DUSTy Roads - LOD Plugin

- Download the main file DUSTy Roads - LOD Plugin. This will overwrite the LOD plugin shipped with DUST Community Fixes & Tweaks
To LOD or not to LOD?
- If you've followed this guide closely and haven't added (or don't plan to add) mods that alter textures or the game world, you can skip generating LOD and simply use the Pregenerated LOD below.
- If you didn't, or prefer to generate it yourself, skip the pregenerated LOD and proceed to Generate LOD.
DUSTy Roads - Pregenerated LOD
- Download the optional file DUSTy Road - Pregenerated Objects LOD
- Download the optional file DUSTy Road - Pregenerated Terrain LOD
You still need the installed LOD resources, but you should disable these two in the left pane of MO2:
- High Priority Core
- High Priority Trees - Vanilla
Generate LOD
DUSTy Roads Compatibility Patch.espHighPriorityLOD.espTreeLOD_Vanilla.espDUST LOD.esp
xLODGen - Terrain LOD
- Download the file xLODGen beta 132
- Extract the 7z-archive to a folder on the same drive as FNV and MO2 (and not a default Windows folder!)
- Add
xLODGenx64.exeas an executable to MO2 (see Adding Executables) - Add
-fnv -O:"D:\xLODGen Output"in the arguments field. Pick a location of your choice - generated LOD will be written to this folder
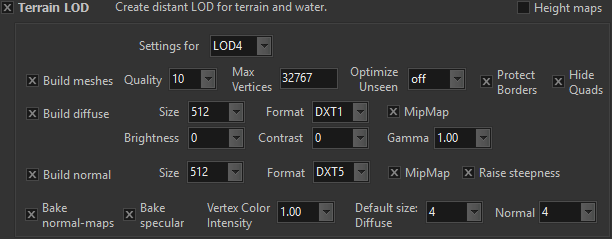
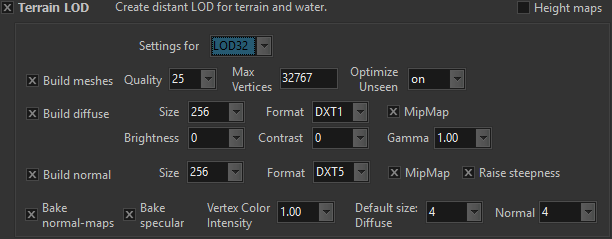
Terrain LOD
When generating LOD, you always start with terrain LOD. Whenever a new mod is installed that modifies terrain, or terrain textures, terrain LOD needs regenerating.
- Select xLODGen from the executables drop-down in MO2 and run it
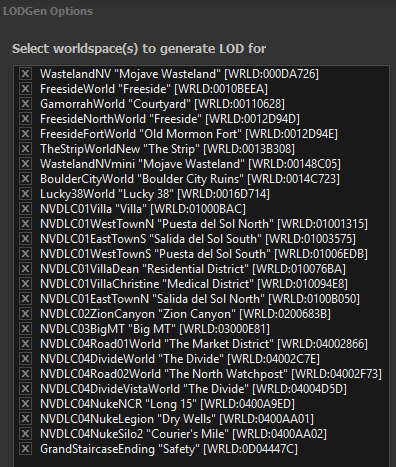
- Right click in the worldspaces pane and choose
Select All - In the right pane make sure only Terrain LOD is enabled
- There are 4 quality levels: LOD4, LOD8, LOD16, and LOD32. By toggling the
Settings fordrop-down, you can set settings per quality level. Use the same settings as in the screenshots below. - Click
Generateand wait until you get notifiedLOD generation done. Close xLODGen  Click the
 Open list options...button on top of the left pane in MO2 (not the toolbar!), and selectCreate empty mod- Name the newly created mod FNVLODGen Output - Terrain, and make sure it is placed last in the left pane
- Navigate to the output folder (the one set in the xLODGen arguments), and move both folders (
MeshesandTextures) to the FNVLODGen Output - Terrain mod - Make sure the mod is enabled by clicking the checkbox


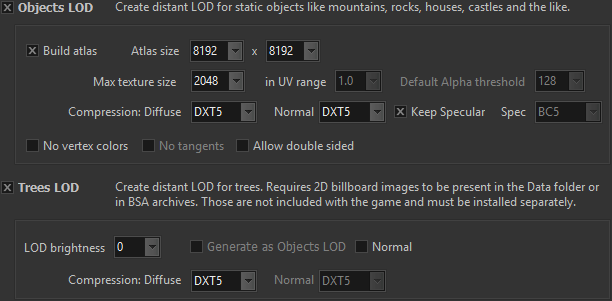
Objects LOD
As with terrain LOD, any mod that alters world objects or textures requires regenerating Objects LOD.
- Select xLODGen from the executables drop-down in MO2 and run it
- Right click in the worlspaces pane and choose
Select All - In the right pane make sure only Objects LOD and Trees LOD are enabled
- Use the same settings as the screenshot on the right
- Click
Generateand wait until you get notifiedLOD generation done. Close xLODGen - Click the
Open list options...button on top of the left pane in MO2 (not the toolbar!), and selectCreate empty mod - Name the newly created mod FNVLODGen Output - Objects, and make sure it is placed last in the left pane
- Navigate to the output folder (the one set in the xLODGen arguments), and move both folders (
MeshesandTextures) to the FNVLODGen Output - Objects mod - Make sure the mod is enabled by clicking the checkbox
Disabling Mods
Once LOD generation is complete, some mods that are only needed during the generation process can be disabled. Leaving them enabled may cause visual issues. But don’t forget to re-enable them before generating LOD again!
- High Priority Core
- High Priority Trees - Vanilla
Packing LOD in bsa Archives
This step is optional, but strongly recommended. This will positively affect the loading times of LOD assets in-game. There are a few caveats however:
- bsa archives require a plugin to be loaded. So the name of the archive should equal that of the plugin, with the suffix - Objects and - Terrain
- Loose files will always override archived files! Check MO2's left pane for conflicts and act accordingly to ensure the right file is conflict winner
- An
.overridefile is necessary to allow archived files to override other archived files (a JIP LN feature)
- I want an optimized game and avoid potential stuttering when loading new areas in-game
- I am able to resolve asset conflicts and get rid of LOD included in other mods as loose files
- I don’t want to deal with checking file conflicts
BSArchPro

A tool for packing and unpacking Bethesda archives.
- Download the optional file BSArchPro
- Extract the zip-archive to a folder of your choice and run
BSArchPro.exe
Packing Object LOD
- In MO2, right click on FNVLODGen Output - Objects and select
Open in Explorer - Drag the
Texturesfolder into BSArchPro - Object textures should be compressed (and only objects textures). In BSArchPro's main window, press
Ctrl + ato select all files, use right click and selectSet Compressed Where Applicable - Drag now the
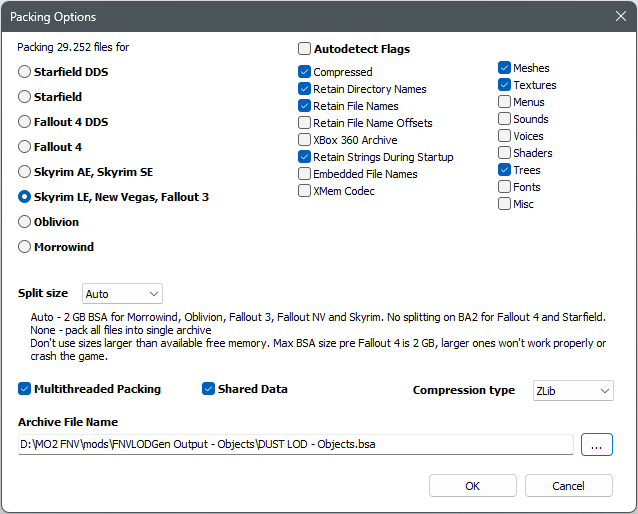
Meshesfolder into BSArchPro, and click thePackbutton - In the new window, make sure same options are selected as on the screenshot to the right
- Use the
...to select the FNVLODGen Output - Objects folder, and useDUST LOD - Objects.bsaas file name - Click
OKto pack - When done, a new window will appear. Click on the
Create .override file(s) for New Vegasbutton, not theOKbutton - In BSArchPro's main window, click now the
Clear Listbutton - Delete now both
MeshesandTexturesfolders
Packing Terrain LOD
- In MO2, right click on FNVLODGen Output - Terrain and select
Open in Explorer - Drag both
MeshesandTexturesfolder into BSArchPro. Terrain textures should not be compressed! - Click the
Packbutton - In the new window, make sure same options are selected as on the screenshot to the right
- Use the
...to select the FNVLODGen Output - Terrain folder, and useDUST LOD - Terrain.bsaas file name - Click
OKto pack - When done, a new window will appear. Click on the
Create .override file(s) for New Vegasbutton, not theOKbutton - In BSArchPro's main window, click now the
Clear Listbutton - Delete now both
MeshesandTexturesfolders - This archive will overwrite the terrain LOD archive included in DUST Community Fixes & Tweaks
