WABBAJACK |
Wabbajack is an automated modlist installer. Instead of manually downloading, installing, and configuring hundreds of mods yourself, Wabbajack reproduces a curated setup as intended by the modlist author.
After selecting a modlist, Wabbajack downloads the required files from sites such as Nexus Mods, installs them, configures Mod Organizer 2, and applies the correct load order and settings automatically. Once the installation is complete, you have a ready-to-play modded setup with only a few manual steps remaining.
If you'd like to learn more about Wabbajack, you can visit the Wabbajack Wiki.
The DUSTy Roads Wabbajack provides two profiles:
- a Base Version featuring DUST, and essential fixes,
- and an Expanded Version that further builds upon this foundation with additional gameplay enhancements and content, such as Expansion Project, Ink & Ash, and more.
You can consult the mod lists on Load Order Library for a complete overview of the included mods: DUSTy Roads - Base | DUSTy Roads - Expanded.
Alternatively, you can browse through the sections of the guide.
Pre-Installation
Prior to starting the automated installation, a few manual steps are required to prepare your system, including installing the game and downloading Wabbajack.
Preparation
It is essential to read and complete the Preparation section of the guide before proceeding with the Wabbajack installation!
Installation
Wabbajack
- Download the installer using the
Download Nowbutton - Create a new folder outside of any default Windows folders or the game folder itself, for example:
D:\Wabbajack - Move the downloaded
Wabbajack.exeinto this new folder, and run it - Click Browse lists, check Non-featured, and search for dusty roads in the Search for a modlist... field
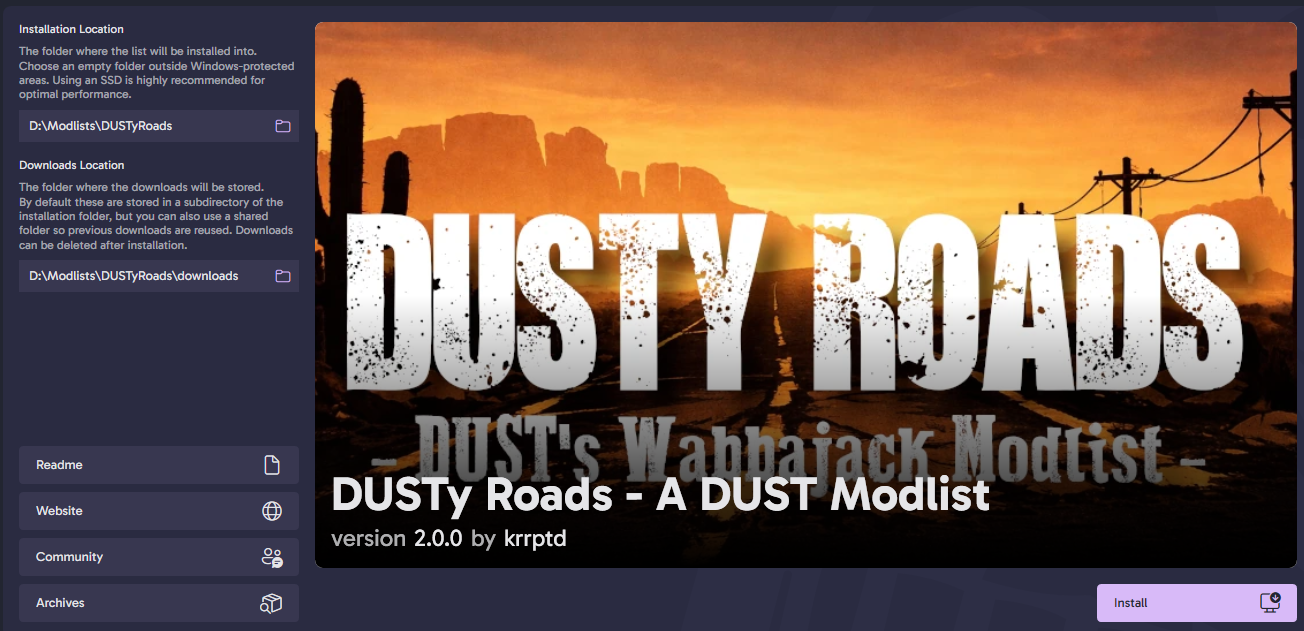
- Click the DUSTy Roads tile, and then click on the Install button at the bottom
- On the left-hand side, set both the Installation Location and the Downloads Location. These folders cannot be:
- the game folder,
- a default Windows folder,
- the Wabbajack folder,
- or another folder already containing a MO2 installation.
D:\Mod Lists\DUSTy Roads - Click the
Installbutton and log in to Nexus Mods when prompted - Authorize Wabbajack, then simply wait for the downloads and installation to finish...
- When finished, click the
Open in File Explorerbutton to open the folder where the mod list is installed
The time required to download and install everything depends on your Nexus Mods account type and internet speed.
Manual Installation
Alternatively, DUSTy Roads can also be installed from disk by first downloading the .wabbajack file.
- Download the main file DUSTy Roads - Wabbajack
- Open Wabbajack, click on Browse lists, and click the Install from disk button on the top-right side
- Locate the downloaded
DUSTy Roads.wabbajackfile, then follow the installation instructions above.
Post-Installation
Just as before the installation, a few manual steps are required before you can start playing.
Copy Required Root Files
Some files that are not managed by MO2 need to be copied manually to the game's root folder.
- In the installation folder of the DUSTy Roads Wabbajack, open the _Manual Install folder
- Copy everything from this folder to the game's root folder:
- xNVSE files
- Vanilla BSAs Patcher files
- FNV 4GB Patcher executable
FalloutNV.exe.
Vanilla BSAs Patcher
Decompresses archives for better loading time and fixes vanilla audio not playing. All configurable through a simple web UI.
- Run
Vanilla BSAs Patcher.exe - Disable
Upgrade Vorbis libraries. If your game is installed on a HDD, disableDecompress BSAsas well - The path should be auto-filled. If not, complete with the path of your FNV installation. Click the ▶ button and wait for it to finish
FNV 4GB Patcher
A patcher that enables 4GB memory access for FNV and automatically loads xNVSE
- Run
FNVpatch.exe, and a window will open with the text“FalloutNV.exe patched!” - Close the window and you'll see
FalloutNV_backup.exeappeared (the original unpatched executable)
Configure MO2
- Launch
ModOrganizer.exefrom the DUSTy Roads installation folder - A Register? pop-up might appear: Select
Yes - Run the game with the Fallout Launcher (not New Vegas) once to detect your hardware and generate the configuration files required by the game
- Click
Options - Select the Ultra preset (or another preset accordingly to your system specifications)
- Set the resolution to your monitor's native resolution
- Exit the launcher, and change the program back to New Vegas
FalloutPrefs.ini. Click the
 Tools button in the toolbar.- Select
INI Editor - Go to the FalloutPrefs.ini tab
- Go to the
Displaysection, and set the following values:
iSize W= screen width (e.g., 2560)
iSize H= screen height (e.g., 1440) - Click the
Savebutton
Finish
Done. That's it. Your descent into cannibalism can now begin. Select the appropriate profile from the drop-down menu at the top of the left pane:
- DUSTy Roads - Base: featuring DUST and essential fixes.
- DUSTy Roads - Expanded: base version with major expansions and additional gameplay enhancements.
And make sure New Vegas is selected in the Run drop-down menu, not NVSE!

Updating DUSTy Roads
Each time a new update is released, the following steps are required:
- Before updating, always consult the changelog for details on new additions, removals, fixes, and any manual update instructions. Existing saves are generally compatible unless noted otherwise.
- Launch Wabbajack and use the same installation folder as the existing mod list installation.
- You only need to re-run FNV 4GB Patcher and FNV BSA Decompressor if your game files have been restored or replaced, for example after verifying/repairing the game files or reinstalling Fallout New Vegas.
[NoDelete] prefix to their names in the left pane. Keep in mind that these mods may still be moved or disabled after updating the mod list.
Support
If you get stuck or run into any issues, we’ve got your back. Join our DUST Discord server and navigate to the #support-and-bugs-dust channel. You can make a new post and tag it appropriately. When asking for support, please follow these simple rules:
- You did some effort to look into the matter yourself.
- You followed the installation instructions.
- You did not install an ungodly amount of additional mods.
- You will share your load order, and mod list (and crashlog in case of CTDs).
- Please keep things polite and clear. I work on this in my spare time, and I don't have a lot of it.
You can also check the guide's FAQ for solutions to common issues.
"Do not contact mod or guide authors for support.
If you use a Wabbajack modlist, only go to that list's curator for support on any issues you may have."
If you're confident enough to get your hands dirty, you can have a look at the ADDITIONAL MODS section for more content.
